Scripts
Scripts are the equivalent to a Sub in VBA or an Office Script. They run at the click of a button and have access to the Excel object model, i.e., they can insert a new sheet, format an Excel range as a table, set the color of a cell, etc.
Basic syntax
A script is a Python function that:
has the
@scriptdecoratorhas a function argument with the
xlwings.Booktype hint
Here is how this looks:
import xlwings as xw
from xlwings import script

@script
def hello_world(book: xw.Book):
    sheet = book.sheets[0]
    sheet["A1"].value = "Hello xlwings!"
The book argument represents the active workbook and can be called differently if you like. E.g., if you want to call the argument wb instead of book, you would write wb: xw.Book instead of book: xw.Book.
You can configure scripts, see Script Configuration below.
Running a script from the add-in
To run a script, i.e., a function with the @script decorator, click on the run button or press F5:
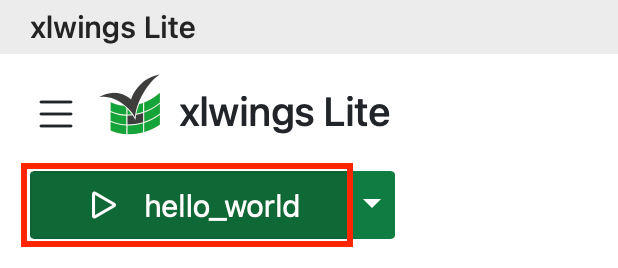
To select a different script to run, select it via dropdown:

Whenever you add a new script or change the name of an existing script, the button and dropdown will update automatically.
Running a script via sheet button
Office.js (the add-in technology that xlwings Lite is programmed in) doesn’t offer a native way to connect a button on a sheet to a script. Therefore, xlwings Lite supports a solution via shapes and hyperlinks. While this is a workaround, it offers a user experience that is on par with the official buttons that Office Scripts offers.
Warning
If your script depends on the selected cells, this solution currently doesn’t work as clicking the button will change the selected cell. Run your script from the task pane instead.
On the Excel ribbon, go to
Insert>Shapesand select e.g., a rounded rectangle. Then draw the shape on the sheet. Adjust colors and text to your liking.Select the shape. In the name box (on the left of the formula bar), give it a specific name, then hit Enter:

For the rest of this example we’re going to use
xlwings_button.Right-click on the shape and select
Link(Windows) orHyperlink...(macOS). On the tabPlace in This Document(Windows) orThis Document(macOS), where it saysType the cell reference, write the name of a cell that is hidden behind the shape, e.g.,B4. Confirm by clicking onOK.Provide the following arguments in the
scriptdecorator (show_taskpaneis optional and opens the task pane if it closed):@script(button="[xlwings_button]Sheet1!B4", show_taskpane=True) def hello_world(book: xw.Book): ...
How does it work? When the xlwings Lite saves the Python code, it registers an event handler that runs the script when the referenced cell is selected. This happens when you click the button as we have set up a hyperlink. Immediately after that cell has been selected, it selects the cell below it to be ready for the next call.
Note
When you open a workbook with a sheet button, you currently need to first open xlwings Lite to activate the buttons. In a future release, you will be able to set the add-in to start automatically so this won’t be required anymore.
Script Configuration
To configure scripts, you can provide the decorator with arguments, e.g.:
import xlwings as xw
from xlwings import script

@script(include=["Sheet1", "Sheet2"])
def hello_world(book: xw.Book):
    sheet = book.sheets[0]
    sheet["A1"].value = "Hello xlwings!"
Here are the settings that you can provide:
exclude(optional): By default, xlwings sends over the content of the whole workbook to Python. If you have sheets with big amounts of data, this can make the calls slow or timeout. If your code doesn’t need the content of certain sheets, the exclude option will block the sheet’s content (e.g., values, pictures, etc.) from being sent to Python. Currently, you can only exclude entire sheets like so:exclude=["Sheet1", "Sheet2"].include(optional): It’s the counterpart to exclude and allows you to submit the names of a few seleceted sheets whose content (e.g., values, pictures, etc.) you want to send to Python. Currently, you can only include entire sheets like so:include=["Sheet1", "Sheet2"].button(optional): If you want to use a sheet button, you need to provide the reference for the button and its linked cell, e.g.,button=[mybutton]Sheet1!A1.show_taskpane(optional): Use this in connection withbutton. Ifshow_taskpane=True, the task pane will automatically show up when the user clicks on a sheet button.
Excel object model
To learn about the Excel object model, have a look at the following docs from xlwings:
API reference (see also Limitations)
It’s also worth looking at the following tutorials:
Limitations
Currently, scripts don’t accept arguments other than
book: xw.Book.xlwings Lite doesn’t support the
apiproperty that classic xlwings offers to workaround missing features.At the moment, xlwings Lite doesn’t cover yet 100% of the xlwings API. The following attributes are currently missing:
xlwings.App

    - cut_copy_mode
    - quit()
    - display_alerts
    - startup_path
    - calculate()
    - status_bar
    - path
    - version
    - screen_updating
    - interactive
    - enable_events
    - calculation

xlwings.Book

    - to_pdf()
    - save()

xlwings.Characters

    - font
    - text

xlwings.Chart

    - set_source_data()
    - to_pdf()
    - parent
    - delete()
    - top
    - width
    - height
    - name
    - to_png()
    - left
    - chart_type

xlwings.Charts

    - add()

xlwings.Font (setting the following properties is supported, only getting them isn't!)

    - size
    - italic
    - color
    - name
    - bold

xlwings.Note

    - delete()
    - text

xlwings.PageSetup

    - print_area

xlwings.Picture

    - top
    - left
    - lock_aspect_ratio

xlwings.Range

    - hyperlink
    - formula
    - font
    - width
    - formula2
    - characters
    - to_png()
    - columns
    - height
    - formula_array
    - paste()
    - rows
    - note
    - merge_cells
    - row_height
    - get_address()
    - merge()
    - to_pdf()
    - autofill()
    - top
    - wrap_text
    - merge_area
    - column_width
    - copy_picture()
    - table
    - unmerge()
    - current_region
    - left

xlwings.Shape

    - parent
    - delete()
    - font
    - top
    - scale_height()
    - activate()
    - width
    - index
    - text
    - height
    - characters
    - name
    - type
    - scale_width()
    - left

xlwings.Sheet

    - page_setup
    - used_range
    - shapes
    - charts
    - autofit()
    - copy()
    - to_html()
    - select()
    - visible

xlwings.Table

    - display_name
    - show_table_style_last_column
    - show_table_style_column_stripes
    - insert_row_range
    - show_table_style_first_column
    - show_table_style_row_stripes