Custom App
A custom app replaces the default buttons and forms in App Mode with your own page. Use it to give end-users a focused interface for your workbook, such as a calculator, a dashboard, or a data entry form. The page is built with HTML, CSS, and JavaScript and can call your Python scripts with xlwings.runScript().
The easiest way to create a custom app is to ask Wingman, for example:
Create a custom app for a polished order calculator with quantity, unit price, and discount (%) inputs. Show the total in a summary card and add a button to append the order breakdown to Excel as a new row. Use orange pill-shaped buttons.
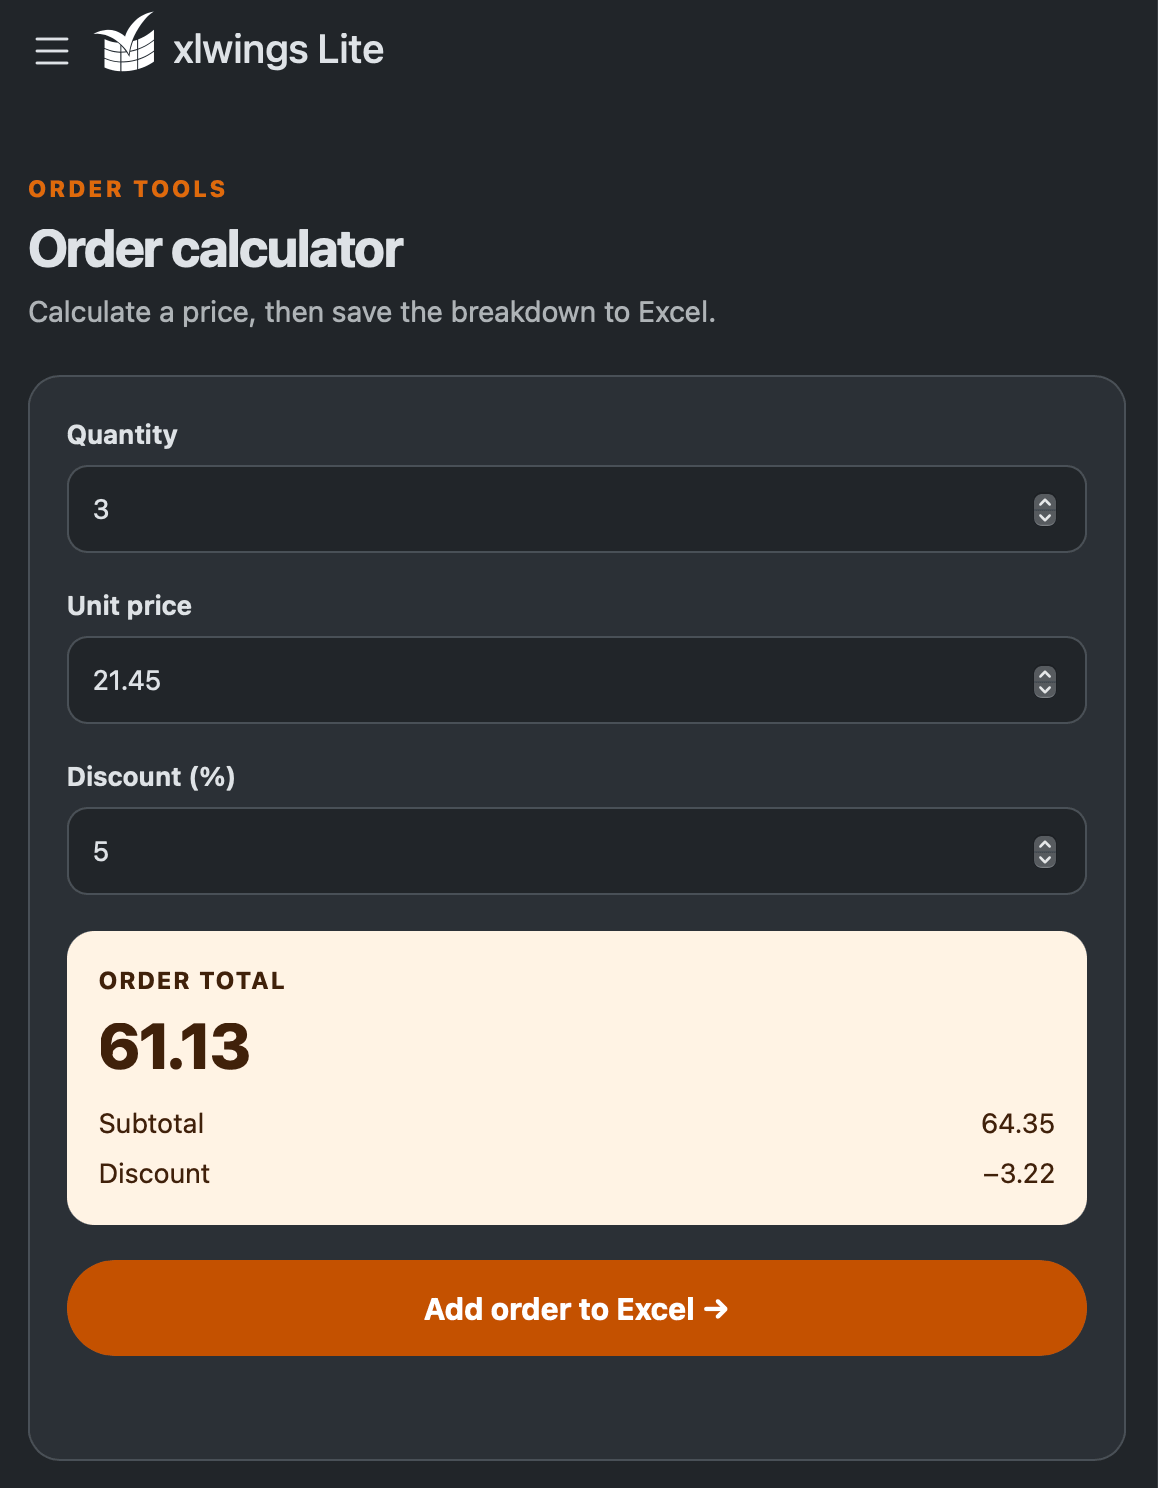
Wingman creates the Python script and the HTML, CSS, and JavaScript source files in your workbook. To display the app, activate App Mode via the Ctrl+Shift+M (Windows) or Cmd+Shift+M (macOS) keyboard shortcuts.
The rest of this page explains how to build a custom app manually.
Bootstrap
xlwings Lite already includes Bootstrap 5.3, so you don’t need to load it yourself. Your page can use:
Bootstrap’s CSS classes, such as
btn,form-control, andtable, with the xlwings Lite theme.Bootstrap’s JavaScript components through the global
bootstrapobject.
Using these classes will make your page adapt to the light and dark themes without extra CSS.
Build a simple calculator
This example uses four source files: main.py, index.html, style.css, and app.js. Create them through the editor’s source file menu, or add the Python function to your existing main.py.
The calculator multiplies a quantity by a fixed unit price, writes the result to the active sheet, and displays it on the page. The currency selector only labels the amounts; it does not convert prices between currencies.
1. Add the Python script
In main.py, define a function decorated with @script so the page can call it. The function receives the form values after the book argument and returns a dictionary for the page to display:
# main.py
from typing import Literal

import xlwings as xw
from xlwings import script

UNIT_PRICE = 9.5


@script
async def calc_total(
    book: xw.BookAsync, quantity: int, currency: Literal["USD", "EUR", "CHF"]
):
    total = quantity * UNIT_PRICE
    book.sheets.active["A1"].value = [
        ["Quantity", "Currency", "Total"],
        [quantity, currency, total],
    ]
    return {"quantity": quantity, "unit_price": UNIT_PRICE, "total": total}
2. Create the page
In index.html, add the form and placeholders for the result and any error message. The <link> and <script> elements load the other two source files.
xlwings Lite displays the content of <body> with 1rem of space around it, so there’s no need to add padding or a Bootstrap container around the whole page. The example uses Bootstrap classes to style the form, result table, and error message:
<!-- index.html -->
<!doctype html>
<html>
  <head>
    <link rel="stylesheet" href="style.css" />
  </head>
  <body>
    <div class="calc-page">
      <h1 class="calc-title">Order calculator</h1>
      <form id="calc-form">
        <label class="form-label" for="calc-quantity">Quantity</label>
        <input id="calc-quantity" class="form-control" type="number" min="1" value="1" />
        <label class="form-label mt-2" for="calc-currency">Currency</label>
        <select id="calc-currency" class="form-select">
          <option>USD</option>
          <option>EUR</option>
          <option>CHF</option>
        </select>
        <button class="btn btn-primary mt-3" type="submit">Calculate</button>
      </form>
      <table id="calc-result" class="table table-sm mt-3" hidden>
        <tbody></tbody>
      </table>
      <p id="calc-error" class="text-danger mt-3"></p>
      <p class="calc-note">Prices exclude shipping.</p>
    </div>
    <script src="app.js"></script>
  </body>
</html>
3. Add custom styles
In style.css, adjust the heading size and style the note below the form. Start each selector with .calc-page to keep the styles within this page. Use Bootstrap’s theme variables, such as var(--bs-secondary-color), so colors adapt to the light and dark themes:
/* style.css */
.calc-page .calc-title {
  font-size: 1.25rem;
}

.calc-page .calc-note {
  color: var(--bs-secondary-color);
  font-size: 0.875rem;
}
4. Connect the form to Python
In app.js, handle the form submission, pass the inputs to calc_total, and display the returned values. If the script fails, show its error message on the page. The button stays disabled while the script runs, since only one script can run at a time:
// app.js
const form = document.getElementById("calc-form");
const button = form.querySelector("button");
const result = document.getElementById("calc-result");
const error = document.getElementById("calc-error");

form.addEventListener("submit", async (event) => {
  event.preventDefault();
  const quantity = Number(document.getElementById("calc-quantity").value);
  const currency = document.getElementById("calc-currency").value;
  error.textContent = "";
  // Only one script runs at a time, so block new submissions until this one
  // finishes.
  button.disabled = true;
  try {
    const value = await xlwings.runScript("calc_total", [quantity, currency]);
    const rows = [
      ["Quantity", value.quantity],
      ["Unit price", `${value.unit_price} ${currency}`],
      ["Total", `${value.total} ${currency}`],
    ];
    result.tBodies[0].replaceChildren(
      ...rows.map(([label, text]) => {
        const row = document.createElement("tr");
        row.append(document.createElement("th"), document.createElement("td"));
        row.cells[0].textContent = label;
        row.cells[1].textContent = text;
        return row;
      }),
    );
    result.hidden = false;
  } catch (err) {
    result.hidden = true;
    error.textContent = err.message;
  } finally {
    button.disabled = false;
  }
});
Try it
Activate App Mode, enter a quantity, choose a currency, and click Calculate. The result appears on the page and in cells A1:C2 of the active sheet. Each calculation overwrites those cells.
To edit the source files, switch back to Developer Mode. Switch to App Mode again to reload the page with your changes.
Styling your page
Custom styles apply to the whole task pane, including xlwings Lite’s own controls. Start each selector with a class on your page’s wrapper, such as .calc-page. Avoid unscoped selectors such as body or button, which can restyle other parts of xlwings Lite.
Prefer Bootstrap’s modifier classes, such as table-hover and btn-warning, when changing its components. For custom component colors, use the component’s CSS variables with the --bs- prefix and account for hover and active states too. A background color on a table, for example, may be hidden by the backgrounds of its cells.
For your own elements, prefer Bootstrap’s theme variables over fixed colors so text remains readable in both themes. The calculator’s note uses var(--bs-secondary-color) for this reason.
xlwings.runScript()
Call xlwings.runScript() from your page’s JavaScript to run a function decorated with @script in your Python source files:
const value = await xlwings.runScript(name, args);
name: the script’s function name, for example"calc_total". If several source files define a script with the same function name, use themodule::functionform instead, for example"reports::calc_total".args(optional): an array containing the arguments afterbook, in the same order as the Python function’s parameters. Do not passbookyourself. Values are converted as they are for App Mode’s form fields: numbers, booleans, strings, arrays, and objects become the corresponding Python types. ISO-formatted strings such as"2026-11-19"are converted according todatetime.dateanddatetime.datetimetype hints. See Script arguments.
xlwings.runScript() returns a promise, so use await to wait for the result. The script runs as usual: it reads the workbook, and its changes are written to the workbook after it returns. Its print() output and tracebacks go to the Output pane, which you can show in App Mode.
Once the workbook changes have been applied, the promise resolves with the script’s return value, converted from Python to JavaScript through JSON. A dict becomes an object, a list or tuple becomes an array, and None (or no return statement) becomes null.
Handling errors
Use try/catch to handle a rejected promise and show a helpful message on the page, as in the calculator example.
The promise is rejected with an Error if:
The script raises an exception.
error.messageis the last line of the traceback, for exampleValueError: quantity must be positive, anderror.tracebackholds the full text.The return value isn’t JSON-serializable, for example a pandas DataFrame or a
datetime.date. In this case, the script’s changes aren’t written to the workbook either. Convert such values first, for example withdf.to_dict(orient="records")ordate.isoformat().NaNand infinity aren’t JSON-serializable either: replace them withNone.No script with this name exists, or the name is ambiguous.
Another script is still running. Only one script runs at a time. Await each call before starting the next one, and consider disabling buttons while a call is in progress to prevent repeated clicks. Do not run scripts concurrently with
Promise.all().The call comes from a page that’s no longer showing, for example from a
setInterval()timer that kept running after the user switched to Developer Mode.
Note
Return values require xlwings >= 0.37.11. If your workbook uses an older version, update the xlwings entry in requirements.txt and restart xlwings Lite.
Displaying a chart
You can draw charts directly on the page, for example with inline SVG, or generate them in Python. To display a Python chart, return a PNG as a data: URI (a string containing the image data) and use it as the src of an <img> element.
The following script plots the values in A1:A10 of the active sheet. Add matplotlib to requirements.txt if it is not already listed:
import base64
import io

import matplotlib.pyplot as plt
import xlwings as xw
from xlwings import script


@script
async def sales_chart(book: xw.BookAsync):
    fig, ax = plt.subplots()
    ax.plot(await book.sheets.active["A1:A10"].get_value())
    buffer = io.BytesIO()
    fig.savefig(buffer, format="png", bbox_inches="tight")
    plt.close(fig)
    return "data:image/png;base64," + base64.b64encode(buffer.getvalue()).decode()
Your JavaScript then sets the returned string as the image source, assuming index.html contains <img id="chart-image" class="img-fluid" alt="Sales chart" />:
document.getElementById("chart-image").src = await xlwings.runScript("sales_chart");
How the page is loaded
The page is shown every time App Mode is activated and removed when you switch to Developer Mode. After inserting the page content, xlwings Lite applies the stylesheets in document order, then runs the JavaScript files in document order. Inline <style> and <script> elements work too. If a linked file is missing or a JavaScript file fails, App Mode shows an error message above the page. Errors that happen later, for example in a click handler, are only logged to the browser console unless your code catches and displays them.
Every JavaScript <script> element runs as a module. This means that its top-level variables aren’t visible to other <script> elements: to share them, assign them to window, for example window.calcState = {}. <script> elements whose type isn’t JavaScript, for example application/json, aren’t run, but stay in the page so your JavaScript can read them.
The page’s JavaScript runs with the same privileges as your Python code and only after the workbook has been trusted, see Trust prompt.
Limitations
JavaScript files can’t
importother source files. Load them with separate<script>elements and share values viawindow.DOMContentLoadedandloadevents have already fired when your JavaScript runs, so run setup code directly instead of in an event listener.Inline event handlers such as
onclick="..."are blocked: useaddEventListener()instead.External JavaScript files and stylesheets, for example from a CDN, aren’t loaded, and
<iframe>elements are blocked.Binary image files can’t be stored as workbook source files. To display images, use
data:URIs orhttps://URLs.Apart from
<link>,<style>, and<script>elements, which can be anywhere in the file, only the content of<body>is used: other elements in<head>, such as<title>or<meta>, and the attributes of<body>are ignored.The arguments and return values of
xlwings.runScript()must be JSON-serializable.Alpine.js isn’t supported.
index.htmlis the only page: links to other source files, such as<a href="other.html">, don’t work. To show several views, put them all inindex.html, for example as<section>elements, and show one at a time by toggling theirhiddenattribute in your JavaScript.Switching to Developer Mode removes the page, but not timers (
setInterval()) or event listeners that your JavaScript added towindowordocument. They keep running, butxlwings.runScript()rejects their calls. Restart xlwings Lite to remove them.